2.3 Post Installation Steps
(Part of a series of SQL Server 2012 training course notes. Previous | Contents | Next)
The first thing to do post install, is to check online for the latest SQL Server Service Pack (Microsoft’s name for patchsets), and apply it:
- Download the service pack executable file from microsoft.com onto the target machine. No login credentials are required to access the download.
- Run the downloaded service pack executable file.
They do not have to be installed one after the other – so Service Pack 4 already contains all of service packs 1, 2, and 3. It is good practice to immediately apply the latest service pack to a new SQL Server before creating the user databases and loading data.
The service pack level of a SQL Server can be worked out by taking the value of Version (right click instance, properties). A table of product version numbers to Service Packs is available at microsoft.com. Primary version numbers are numbered rather than following year notation – SQL Server v6.5, v7, v8 = 2000, v9 = 2005, v10 = 2008, v10.5 = 2008R2, v11 = 2012.
2.4 Post Installation
SQL Server’s services can be viewed, modified, stopped, and started in the SQL Configuration Manager (‘Start’ > ‘Programs’ > ‘Microsoft SQL Server 2012’ > ‘Configuration Tools’ > ‘SQL Server configuration Manager’ > ‘SQL Server Services’)
They are also available with all other services in the Computer Management Console. Right click my computer, choose manage, expand SQL Server Configuration Manager. (Alternatively, “Start” > “Run” > “services.msc”)
SQL Server Agent is required to run jobs and maintenance plans – especially database backups. A default install would have left that set to not start automatically, so check it is set to automatic startup now and change if necessary. The main SQL Server service should also be set to start automatically on reboot.
But if running SQL Server as a development environment on your own PC, you should set the services to startup manually on demand only, otherwise significant memory will be wasted running SQL Server in the background.
Lab 1.2 – Modify, stop, start services
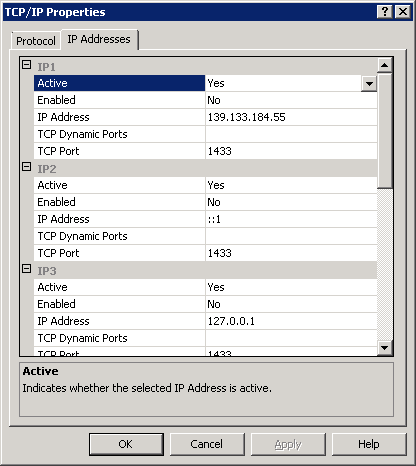
Also in SQL Configuration Manager, the listener port for SQL Server connections can be changed from its default value of 1433. This is under ‘SQL Server Network Configuration’ > ‘Protocols for MSSQLSERVER’ (or instance name) > ‘IP Addresses’. This is often changed to another port number as a security measure – otherwise client programmes, including SQL Server Management Consoles, will automatically detect and list running SQL Servers.
2.5 Remote Administration
SQL Server Management Console can connect to databases on different servers, and manage them just as if you had a local remote desktop connection. This is useful for replicating or mirroring one server from another, and also for connecting from your own PC from e.g. Express Edition management console.
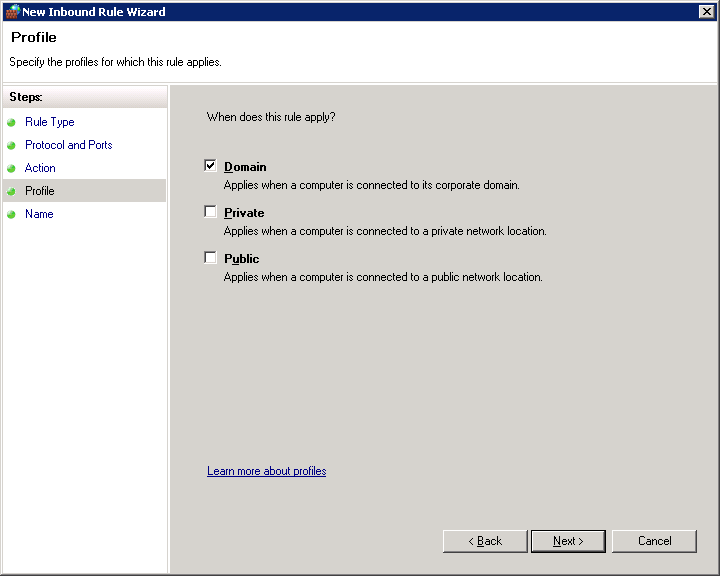
However the firewall on the target database server will prevent this by default. If you want to relax the firewall rules to allow this (you may not – it is after all a potential security risk), then follow the steps in Configure a Windows Firewall for Database Engine Access (for port 1433 as default).
When you connect in SQL Server Management Studio, enter “(local)” in server name for a connection to the instance running on the local server, or enter fully qualified server name for a connection to a remote instance. Clicking browse searches for SQL Servers listening on the default 1433 port (which could be a potential security concern, so for that reason some DBAs will change listener port to a non default port number).
If you do relax the firewall rules, it is worth allowing the relaxation only for computers in the same domain – a change from the default in the wizard:
Lab 1.3 – Open SQL Server Management Studio, view the system databases, create a new database.
OR
Lab 1.3 – download and install the sample Adventure Works database , open SQL Server Management Studio, open a table for editing.
(Part of a series of SQL Server 2012 training course notes. Previous | Contents | Next)


Leave a Reply