6 Restore
(Part of a series of SQL Server 2012 training course notes. Previous | Contents | Next)
When disaster strikes, the procedure to follow is:
- Optionally set to “Single_User” and “DBO Use Only” boxes in “database” > “properties” > “options”. This will prevent users interfering with the restore in progress.
- Back up the transaction log with “backup the tail of the log” option – that is, back up the transaction log without truncating.
To do this:
- Right click database, select “tasks” > “backup database”
- Change backup type to “Transaction Log” radio button in the general tab
- Important – Select the “Backup the tail of the log, and leave the database in the restoring state” radio button in the options tab.
The T-SQL syntax for this (“backup log <database> with no_truncate”) can be seen with the “script” button.
This is required to regress in case something goes wrong with the restore. It is the same as the oracle requirement to copy the on line redo logs before starting a restore.
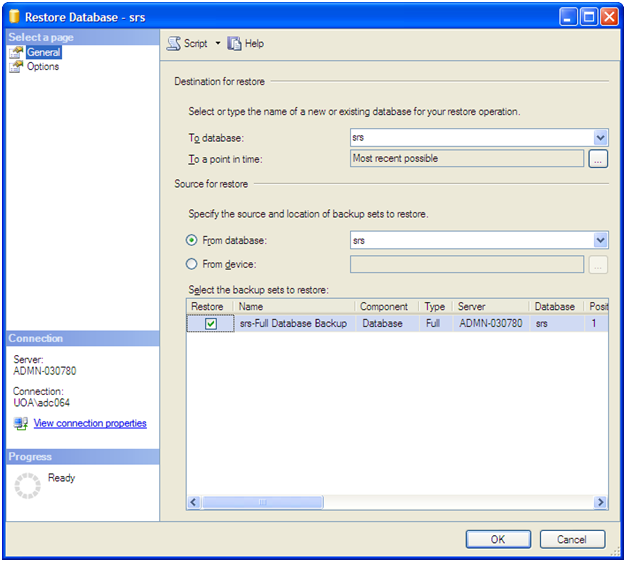
- Now you can run the restore: database > tasks > restore database.
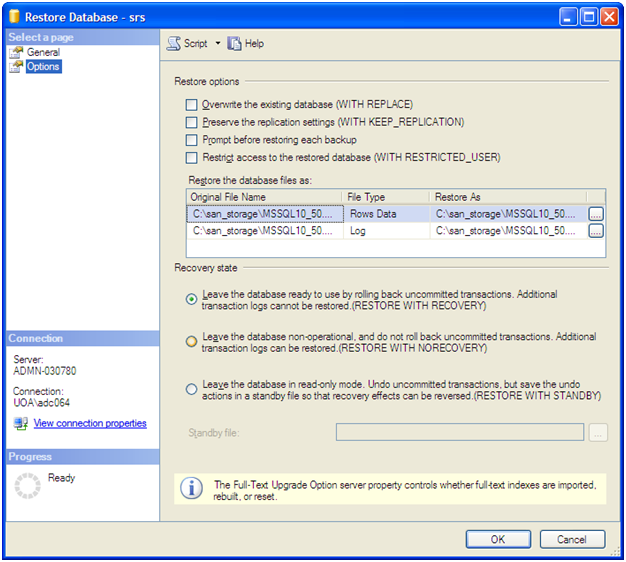
If you have multiple backups to restore, click the “Leave the database non-operational, and do not rollback uncommitted transactions. Additional transaction logs can be restored (RESTORE WITH NORECOVERY) ” button in the options tab. The restore will then have to be run for the extra backups. Cases where this applies are:
- Partial backups are being employed; and/or
- Transaction log backups are taken at intervals in-between the full or partial backups
If you wish to restore to a point in time, specify this in the general tab.
Note that you can restore into a different database or into a new database name from the “Restore to database” box in the general tab.
Lab 6.1 – restore a database
6.2 Rebuilding Master
A SQL Server instance that will not start up at all may start in “minimal confugration mode”. This can be run from command line DOS prompt with:
C:\> sqlserver.exe –c –f -m
If the master database is lost, it should be restored from backup in exactly the same way as any other database. However, if you cannot even start SQL Server in the first place (because master is damaged), it is possible to rebuild the master, model and msdb databases without having to carry out a reinstall of SQL Server.
To do this:
- Run setup.exe with the rebuilddatabase action:
DOS> setup /quiet /action=rebuilddatabase
setup.exe is in “C:\Program Files\Microsoft SQL Server\100\Setup Bootstrap\Release” - Restart the SQL Server service
- Restore backups of the master, model and msdb databases in the normal way.
Or, if there are no good backups of these three databases,
Manually attach all the databases to master using the sp_attach_db and sp_attach_single_file_db stored procedures. Also manually recreate all jobs in the msdb database and manually make any required changes to the model database.
This is detailed at http://technet.microsoft.com/en-us/library/dd207003.aspx
6.3 Standby Databases
SQL Server standby databases are similar to Oracle standby databases. Like Oracle:
- Transaction logs are shipped from the live to the standby database and then applied to the standby database
- When recovery is performed (eg “restore database with recovery” T-SQL statement), the standby database is no longer a standby database. It must be rebuilt from a backup of live to function again as a standby database.
- Read only access is allowed to the standby database.
6.4 Cloning Databases
To copy a database either to the same server or to another server, use the Copy Database Wizard within SQL Server Management Studio (see chapter 8 below).
Alternatively, you can image copy its database files and transaction log files to the target server, then attach it using the sp_attach_db and sp_attach_single_file_db stored procedures. Also useful are the sp_dropserver and sp_addserver stored procedure swhen renaming a server instance.
(Part of a series of SQL Server 2012 training course notes. Previous | Contents | Next)


Leave a Reply